Installation
Virtual Environment – archiconda
Install the archiconda environment at terminal
wget https://github.com/Archiconda/build-tools/releases/download/0.2.3/Archiconda3-0.2.3-Linux-aarch64.sh
sh Archiconda3-0.2.3-Linux-aarch64.sh
Reference: https://blog.csdn.net/qq_40691868/article/details/114362278?spm=1001.2014.3001.5501
[Not Nesessary] In order to enter the system path environment when enter the terminal. It needs to comment the code "conda activate base" in ".bashrc"
# added by Archiconda3 0.2.3 installer
# >>> conda init >>>
# !! Contents within this block are managed by 'conda init' !!
__conda_setup="$(CONDA_REPORT_ERRORS=false '/home/jetson/archiconda3/bin/conda' shell.bash hook 2> /dev/null)"
if [ $? -eq 0 ]; then
    \eval "$__conda_setup"
else
    if [ -f "/home/jetson/archiconda3/etc/profile.d/conda.sh" ]; then
        . "/home/jetson/archiconda3/etc/profile.d/conda.sh"
        CONDA_CHANGEPS1=false #conda activate base
    else
        \export PATH="/home/jetson/archiconda3/bin:$PATH"
    fi
fi
unset __conda_setup
# <<< conda init <<<
create a new environment
It better to keep the python version consistent with the system.
conda create --name mytest python=3.6.9
conda activate mytest
Connect the prebuild packages to the virtual environment
- (useless, need further verification) Enter the python interactive command, there is no opencv package.
It needs to allows the conda environment to be reintroduced to the global/user site packages.
Enter the virtual environment through
export PYTHONNOUSERSITE=0 conda activate <YOUR_ENVIROMENT>-
(useless, removed later) Connect the OpenCV Package
import sys sys.path.insert(0, "/usr/lib/python3.6/dist-packages/cv2/python-3.6/") -
(useless, removed later) Connect the TensorRT Package
from importlib.machinery import SourceFileLoader
tensorrt = SourceFileLoader("tensorrt", "/usr/lib/python3.6/dist-packages/tensorrt/__init__.py").load_module()
Installation
Install ONNX runtime on NVidia Xavier through Jetson Zoo: https://elinux.org/Jetson_Zoo#ONNX_Runtime
Install on PC through conda:
- To install ONNXRuntime version 1.6 with GPU support, it needs to install CUDA10.2 CUDNN=8.0 in the conda environment.
- For other version, please refer to https://onnxruntime.ai/docs/reference/execution-providers/CUDA-ExecutionProvider.html#requirements
conda install cudatoolkit=10.2
conda install -c conda-forge cudnn
pip install onnxruntime-gpu==1.6.0
Visualize ONNX model
Netron is a viewer for neural network, deep learning and machine learning models.
Netron supports ONNX, TensorFlow Lite, Keras, Caffe, Darknet, ncnn, MNN, PaddlePaddle, Core ML, MXNet, RKNN, MindSpore Lite, TNN, Barracuda, Tengine, TensorFlow.js, Caffe2 and UFF.
Just upload the ONNX model to the website: https://netron.app/
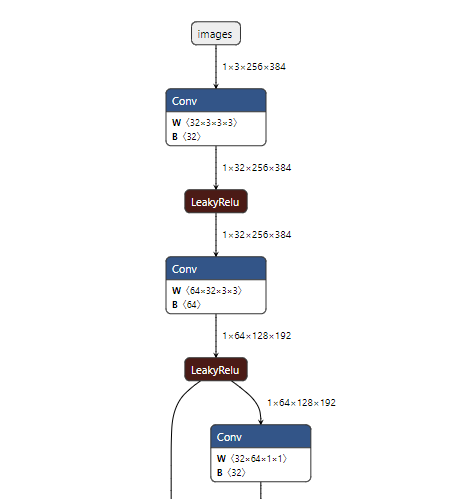
Sample visualzation:
Check whether the installtion is successed.
Copy the following codes to a python file, and run it.
it will use the offical model "logreg_iris.onnx" for inference, and the output looks like:
float_input [3, 2] tensor(float)
label [3] tensor(int64)
[‘CUDAExecutionProvider’, ‘CPUExecutionProvider’]
0.05724787712097168
2.782236099243164
import onnxruntime
import numpy as np
import time
from onnxruntime.datasets import get_example

example_model = get_example("logreg_iris.onnx")
sess = onnxruntime.InferenceSession(example_model)

input_name = sess.get_inputs()[0].name
input_shape = sess.get_inputs()[0].shape
input_type = sess.get_inputs()[0].type

print(input_name, input_shape, input_type)

output_name = sess.get_outputs()[0].name
output_shape = sess.get_outputs()[0].shape
output_type = sess.get_outputs()[0].type

print(output_name, output_shape, output_type)

x = np.random.random(input_shape)
x = x.astype(np.float32)

print(sess.get_providers())

sess.set_providers(['CPUExecutionProvider'])
start_time = time.time()
for i in range(1000):
    result = sess.run([output_name], {input_name: x})
end_time = time.time()
time_elapsed = end_time - start_time
print(time_elapsed)

sess.set_providers(['CUDAExecutionProvider'])
start_time = time.time()
for i in range(1000):
    result = sess.run([output_name], {input_name: x})
end_time = time.time()
time_elapsed = end_time - start_time
print(time_elapsed)
Depoly to TesnorRT
reference: https://zhuanlan.zhihu.com/p/372355566
check TensorRT version
dpkg -l | grep nvinferEnter the virtual environment through
export PYTHONNOUSERSITE=0 conda activate <YOUR_ENVIROMENT>
```bash